In dance music genres such as house, the bass plays an important role – in many cases being the key to a successful track. This depends not only on the bassline arrangement but also on the texture of the sound. The character of this instrument must fit with other components, that create – in this case – a complete soulful or funky house track.
The design of the bass sound is fairly simple. One needs a simple mono synthesizer – preferably with filter parameters that can be key-tracked (in this case we’ll use FL Studio’s popular Sytrus synth), a guitar amplifier simulator with a speaker cabinet impulse response for bass sounds, an EQ and a standard compressor. In addition, some effects on sends might be added – we will discuss those at the end of this tutorial. Here’s how it works: first, a filtered saw signal is dramatically attenuated with EQ, then it passes through the amp simulator, and is finally compressed.
Step 1
Firstly, if you don’t already have a guitar amp VST, you’ll need to get one. Other plug-ins needed for this tutorial are already in FL Studio and are perfect for the job.
I strongly recommend the Voxengo Boogex freeware plug-in.
Step 2
Now we’ll program our bass patch. Load a new Sytrus instance into the step sequencer and pick the "Default" preset – it should be the first one on the presets list.
Choose the first operator (OP 1), change the shape to saw and tweak the freq-ratio parameter to 0.2500 – you should get the result pictured below:

Next, set the routing up. We need to patch the first operator (OP 1) through the first filter (FILT 1) with the following parameters:
- Filter Type : SVF x2 (with high quality)
- Cutoff : ~15%
- Resonance : ~80%
The routing matrix is showed below to make things easier. Additionally, we’re setting up the key-tracking for the cutoff parameter:

You can always tweak that key-tracking according to your taste. It’s easier to set up the border points in the first place.
Finally, it’s preferable to switch our bass into monophonic mode with some legato. We do this by setting up channel settings on the Misc tab:
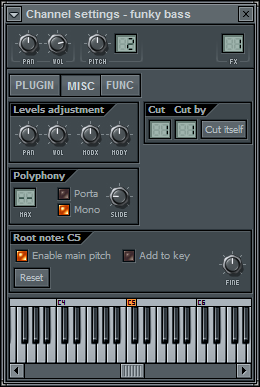
Our patch is now configured. Let’s move onto configuring the FX rack.
Step 3
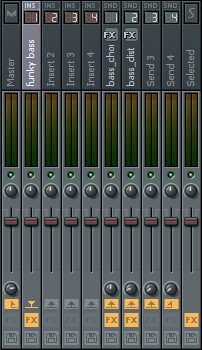
Bring up the mixer and set the routing from the Sytrus plugin to Insert 1. Load up Parametric EQ 2, Voxengo Boogex and Fruity Limiter.
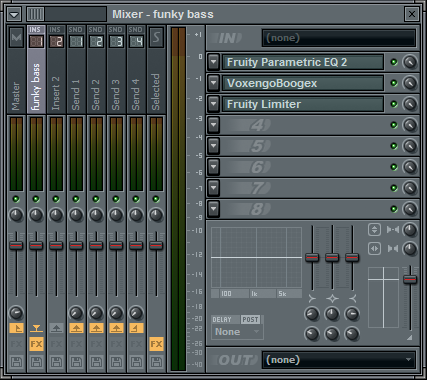
Focus on the Parametric Eq 2 plug-in. We will do dial in attenuation with peak band in the range between 100 and 400Hz. Depending on which frequency we choose, we’ll get a darker or brighter sound. This decision should be made according to other elements in the mix, such as the bass drum or keys (for example, a Rhodes). In this tutorial we’ll make it 150Hz and a ~12dB boost:

Bring up the Boogex, load up the Speaker Cabinet F Impulse Response and turn the drive parameter to 0dB. Notice how boomy this sounds. Turn the gain parameter to about -18dB.

Our bass setup is nearly ready. Still, the instrument could use a better attack and be more stable, depending on the key. We will try to fix this with the Fruity Limiter, which provides us not only with limiting functions, but has a functional compressor. First, switch the tab to COMP. Then, configure the parameters roughly as follows:
- Threshold: ~ -25dB
- Ratio: 1.6
- Attack: ~40ms
- Release: ~50ms
- Ahead: 0ms
- Envelope curve: -4

Then, switch to the LIMIT tab and configure:
- Gain: 1.0 dB
- Limiter Ceiling: -3.2dB
Here’s the result so far:
Step 4
We can take this texture a bit further and make it more exciting, for example by adding a proper chorus send effect. To do this, first select the send track in the mixer and load another instance of Parametric EQ 2 – we will use it to cut low frequencies off sharply. Next, load any chorus effect plugin (in this case we’ll use Fruity Chorus) after the EQ. Load the “40Hz cut” preset and change it to approximately 200Hz.

This will prevent low frequencies being processed by the chorus – we want to leave them as they are, mostly to ensure the lower sounds remain stable after merging to mono. The chorus plugin can be adjusted to taste. In this tutorial we’re using the following settings:
- Delay: ~6 ms
- Depth: ~3 ms
- Stereo: 128 degrees
- LFO 1 Freq: ~0.36 Hz (other lfo’s disabled, ie. 0Hz)
- LFO 1 Type: Sine
- Cross Type: Process HF
- Cross Cutoff: ~200Hz
- Wet Only: Yes
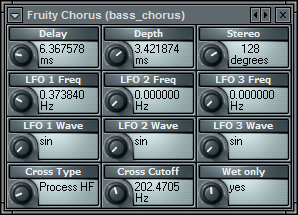
After setting up the Send 1 rack, we need to route some amount of signal from the Insert 1 track. Turn the Send 1 amount knob to ~64%.
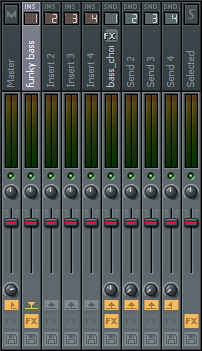
The result should sound similar to this:
Step 5
If we want this particular bass sound to have more edge, we can use another send, again with high pass and with additional distortion. Set up a Parametric EQ 2 in similarly to Step 4 (this time make the cutoff frequency higher, ~300Hz). Load up Fruity Waveshaper after the EQ and select the “Softmunched” preset from the plugin preset menu.
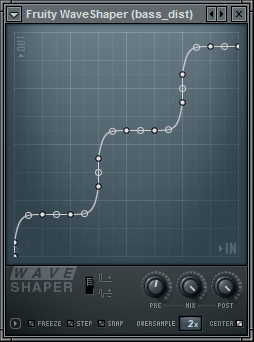
This time we will send a considerably smaller amount of signal – tweak the Send 2 amount knob to ~10%.
Here’s the final result:
For a more personalized result, you should experiment with different filter setups, frequencies of attenuation, or different bass cabinet impulses.

Comments :
Post a Comment