In this tutorial we are going to go over how to create a powerful punching kick drum sound in FL Studio. Traditionally this would require us to have multiple high quality kick drum recordings from which to work from. We would need to trim them so they occur at the same instance, EQ out phase cancellations, etc and possibly still not get the sound we want.
Instead we are going to use Image-Line’s new VST, Drumaxx. Drumaxx is a percussion synthesizer that lets us mold and create our drums as we see fit without any samples. This will let us tweak the drums at any point in the process without having to back track through multiple saved files. In addition we will still be able to add effects and tweak them more by simply sending them off to a track in the mixer. Let’s get started!
Step 1: Setting up Drummaxx
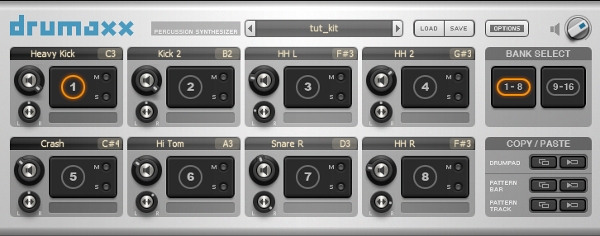
First open up a new empty project, right click the Sampler and replace it with Drumaxx. Using the default kit, go and click the top left drum pad to select it and make sure the pan is at 0 and the volume is between 75% and 100%. You most likely will need to adjust this depending on how you tweak your kick to prevent distortion.
Step 2: Configuring and Tweaking Drumaxx
Now we must configure the drum pad to get closer to our desired kick sound. You can either follow picture associated with this step or copy these specific knob values as a starting place…
- Mallet: Amplitude 75%, Decay 19%, Noise 100%, Noise Phase 37.50%, Retrig On
- Membrane: Decay 100%, Cutoff 0%, Tension 25.50%, Phase 0%, Material 50%, Size 83.50%, Shape 100%
- Low: Freq 46%, Reso 100%
- Middle: Freq 39%, Level 100%, Reso 100%, EG Freq -25.50%, EG Level 0%, Decay 56%, Retrig 0
- High: Freq 64%, Level 44% Reso 0%
- Output: Hold 100%, LoFi 0%, Pitch -70%
Keep in mind that Drumaxx never recreates exactly what you hear when you manually recreate a patch, only copy and paste will do that. Use the reference clip to compare to yours and tweak appropriately. Also, the parameters Noise Phase and Size tend to have a lot of effect on the overall sound; as do the freq knobs and mallet amplitude.

Your kick should sound something like this…
Step 3: Getting Drumaxx to the Mixer
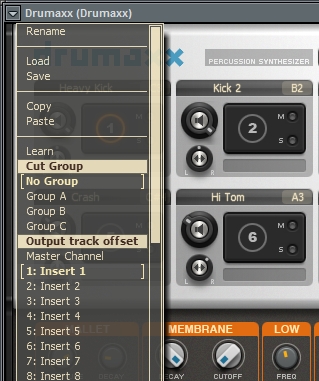
Now that we have set up our basic synthesized kick we need to get it to the mixer so we can further manipulate it. Click where it says the name of the drum pad and select Rename and name it Heavy Kick. Bring up that menu again but this time select Insert 1. Be sure not to route Drumaxx itself to a insert like you would for a regular synth, this will offset the entire naming scheme of the drum pad assignments.
Step 4: Setting up the Kick so we Can Hear it
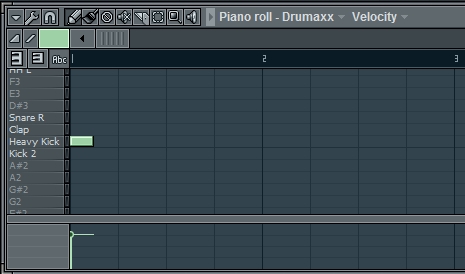
Before we begin to tweak the kick drum, we need to set the project up so that we don’t have to keep clicking the drum pad to hear it. Also, an occasional side effect of clicking the drum pad is that it plays louder than it actually is; instead we will use the piano roll. Open up the piano roll for Drumaxx and soon you’ll see that some of the notes have names corresponding a drum pad.
Each drum pad has an assignable Midi note next to its name so they can be played via piano roll. Go to the one that says Heavy Kick or whatever you named yours, and put in one quarter note. Then paste this pattern to the Playlist and hit play so you hear a loop of the kick drum.
Step 5: Adding a Compressor
With our Heavy Kick drum pad now going to insert one we need to start modifying the harmonic content of the kick. Add a Multiband Compressor to the first effects slot for Insert 1. Select the preset Mastering 6dB and tweak them so that…
- The Limiter is off
- Each ATT(attack) knob is set to 0.1ms
- The gain for the Low Band is +5db
- The Mid Band is +5db
- The High Band is 0db
Again these are just starting points, you may need to adjust yours for your particular sound.

Your kick should sound something like this; tweak as appropriate…
Step 6: Playing with EQ
Now that we have a more tight kick from the compressor, we need to give it that punch via an EQ; remember a punching kick sounds like a soccer ball or football being kicked. Add an Parametric EQ2 to the next effects slot right after the compressor. Again, follow the picture or the specific directions…
- Band 4: +4db, BW 40%, Freq 650Hz
- Band 5: +7db, BW 75%, Freq 1,300Hz
- Band 6: +3.5dB, BW 30%, Freq 2,500Hz
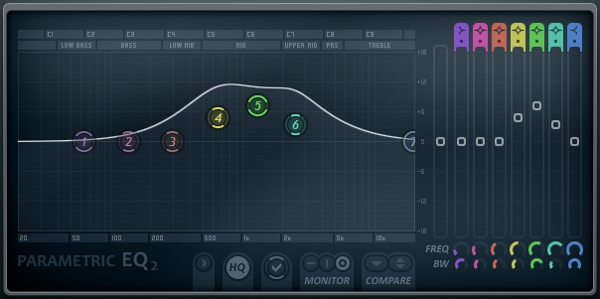
Your kick should sound something like this; tweak as needed…
Step 7: Thickening it Up
While this kick already sounds nice, we need to give it that extra push to really send it home. Add an Fruity Delay 2 to the next effects slot and copy the pictures settings. Unfortunately this plug-in does not giver percentages but remember the most important part is that the Time knob needs to be as far left as possible. Use the sound clip as a reference.
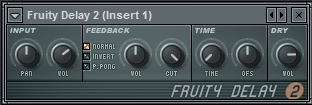
Your kick should sound something like this…
Step 8: Adding Space
With our kick now having ample punch and boom all it needs now is a place to stay. Add a Fruity Reeverb 2 to the next effects slot and select add these settings.
- Hi Cut: 0.5kHz
- Low Cut: Off
- Predelay: 0ms
- Room Size: 100
- Diffusion: 100
- Bass: 150%
- Crossover: 350Hz
- Decay: 1.5sec
- Dampening: 0.5kHz
- Dry and Early Reflection: 100%
- Wet: 30%
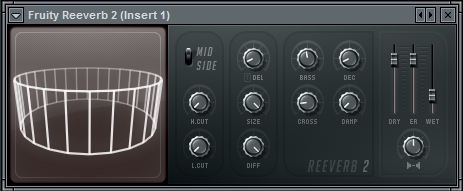
Here is our end result; adjust the reverb to taste.
After thoughts
Now that you have created the kick how do you use it? You can create patterns within Drumaxx and as long as you keep your track assignments or you can export the kick as a sample to use in a sampler. Something fun to try is to EQ out all the hi end and increase the wet level on reverb and decrease the dry level; this will give you a basic atom bomb effect. Hope you enjoyed!

Comments :
Post a Comment