Ever heard a song by T-Pain on the radio and wondered how the robotic vocal effect is achieved? By the end of this tutorial, you will own the autotuning sound that is used on so many pop records right now.
Listen to some examples of this effect in action:
Cher – Believe (First Pop Instance of Autotuning)
You may assume that it takes a masterful engineer and a lot of money in hard effects to get that autotuned sound, but that’s not the case: using only a few steps and a simple plugin you will be well on your way. In this tutorial we’ll go one step further and show you how to create an autotuning effect that sounds as good as the pros.
This tutorial assumes basic knowledge of VST effects and FL Studio. You will need Antares AutoTune VST or a similar autotuning VST to perform this effect correctly, and of course, a microphone that is able to record into FL Studio. Besides that plugin, I will be using the effects packaged with FL Studio to finish shaping the sound.
Tutorial Setup:
- iMac Core2Duo 2.16ghz
- 2GB Ram
- Audio Technica ST90 Microphone ($25!!)
- Alesis IO 26
Step 1
Make sure you’ve purchased Antares AutoTune, a similar VST, or have picked up the demo. If you’re wary of purchasing this product, I’ve found that if you are working with any sort of vocals it pays for itself almost immediately.
We are going to setup a mixer channel in FL Studio to pickup our microphone. Mine is on Blobusound Channel 2, so I select that accordingly.
If done correctly, you should have activity on the input meter. If not, you’re going to need to check your ASIO/WDM settings, or make sure that you have a soundcard or interface that can support a microphone input.
Assuming you have activity coming in and that you can hear yourself, load Antares AutoTune onto the first slot of the mixer. Notice any difference? You probably can’t–we need to change some settings before going further.
This is the raw vocal I’ll be working with in this tutorial:
raw_vocal.mp3
Step 2
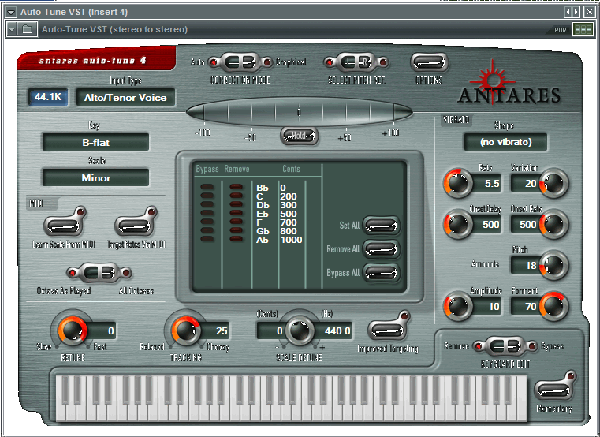
At this point, you’re going to want to change the “Input Type” at the top. This helps the tuning engine accurately adjust the incoming signal (in this case, your voice) to “tune” correctly. We are going to manipulate the tuning engine by changing it to “Alto/Tenor Voice”. This will trick the AutoTuner into shifting your voice upwards, and “filling in” your missed notes with a synthesized “voice.”
With the input type changed, it is now time to change the key and scale. T-Pain’s hit song ‘Buy U A Drank’ is in B-flat minor, so we’ll change the key to B-flat and the scale to minor.
You may notice some difference here, but the key to real auto-tuned vocals is to change the “Retuning” threshold to as fast as possible, in this case “0.” With it down at zero, when your voice fluctuates from note to note, it detects what note your voice is in, then jumps it to the next note in the scale, keeping it in key. With these basic settings in place, you should be singing your robotic heart out.
vocal_autotuned.mp3
But this is just the basic effect, and through my $25 “>Audio Technica mic, it is sounding a little dry.
Step 3
The spirit of this effect is to sound a little more robotic, so what we are going to do now is further create that robotic/artificial sound using other effects. These effects will change from microphone to microphone, so it is important to experiment until you get the sound you’re looking for.
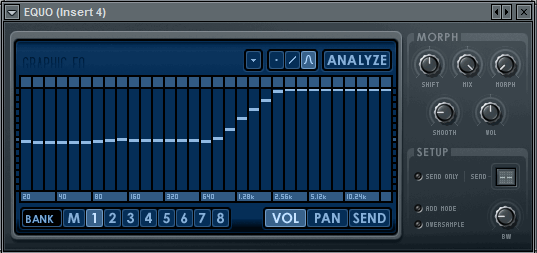
The next thing in my FX chain after the auto-tuner is going to be an EQ plugin. I’ll be using this EQ to brighten up the highs, and exaggerate the artificial effect. Using EQUO, I’ve boosted all of the frequencies past 2.5khz to about 400%. This exaggerated EQ will add even more definition to the robotic effect. This may produce too much brightness on nicer microphones, so you may want to start at 400% and work your way down until you’ve got a reasonably bright vocal.
vocal_autotune_eq.mp3
Step 4
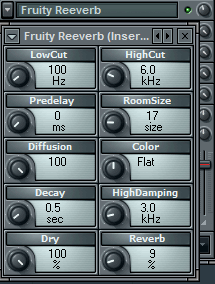
After the EQUO, I’ll add a Reverb effect to the chain. This is my standard vocal Reverb palette, and I’ve placed it at about 50% volume to make sure that it isn’t too overpowering on my vocals.
vocal_autotune_eq_reverb.mp3
Step 5
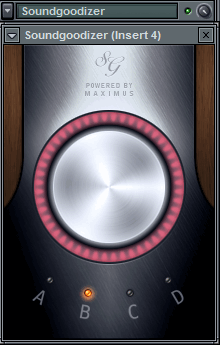
Optional: At this point, I’ve found that inserting the newly-added Soundgoodizer plug-in after the Reverb works very, very well on autotuned vocals. Give it a shot in the effects chain to get some interesting effects due to Soundgoodizer’s limiter. It also keeps the volume level high and limited, which adds to the artificial sound.
Step 6
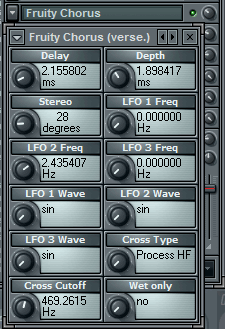
After the Fruity Reverb, I’ll add what is probably the most important and delicate effect in the chain, a chorus. Refer to the settings snapshot to recreate this wonderful effect: it will give your vocal plenty of depth, and it has convinced many of my listeners that I am not, in fact, recording on a $25 microphone!
vocal_autotune_eq_reverb_chorus.mp3
Step 7
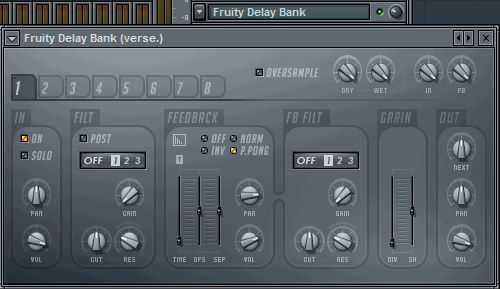
Moving on from there, my next effect is the Fruity Delay Bank. I’ve kept this one simple, and it will create a little more atmosphere along with the Reverb that was added earlier in the chain. Notice that I’ve used some pretty crazy volume/mix values for the effects. Sometimes an effect becomes too overpowering at full volume, so experiment with turning it down until you achieve a nice balance.
To smooth everything out after the Fruity Delay Bank, I’ll throw a Fruity Compressor onto the channel and you are recording-ready and set to sound like T-Pain!
Listen to the final product:
vocal_autotune_eq_reverb_chorus_delay_compression.mp3
Download the Play Pack for this tutorial (1.4MB)
Contents:
- All audio files
- Printable PDF tutorial
- Bonus audio: autotuned vocal acappella.
Nic Bertino is a professional producer and recording artist from Sacramento, California with over 9 years of production experience.

Comments :
Post a Comment