it isn’t often that a simple, under-produced beat is the soundtrack to a song that sells millions of copies. Even more amazing was that Soulja Boy was able to create this song using only stock sounds that come with FL Studio!
In this tutorial I’ll show you how to re-create Soulja Boy Tell ‘Em’s ‘Crank That’ in FL Studio. This process will walk you through the construction of a #1 smash-hit and demonstrate that you don’t need top of the line tools to create a best-selling hip hop track.
Step 1
Before we get started, the tempo of the song is 70bpm. I have set the “Beats per Bar” on FL’s Step Sequencer to 8 to keep things organized.

Step 2
The hook in this song is a steel drum hit titled “PERC_SteelDrum_C5.wav.” As stated before, this and all of the other sounds that were used to make this song are available in the stock sound packs that come with FL Studio.
You can find “PERC_SteelDrum_C5.wav” by browsing to Packs > Percs.
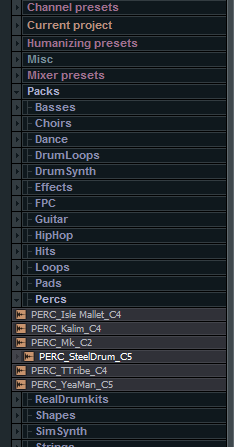
Right click the file and go to “Open in new channel”. This will bring the file into a new sampler channel. Turn the volume knob up to all the way, then right click the channel name and click “Piano Roll.”

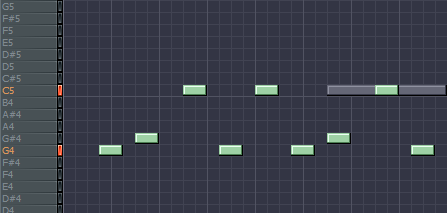
Once you’ve got a piano roll window up you will be drawing the simple steel drum melody to this track. It uses notes C, G, and G# to create the melody. Copy this rhythm to recreate the hook exactly as it is in the commercial version of the song:
step_2.mp3
Step 3
Sound like the real thing? Not quite–we’re going to need to put some effects on it to match the original. Put the Steel Drum sample on its own channel, and simply add some reverb and compression to liven up the sound.
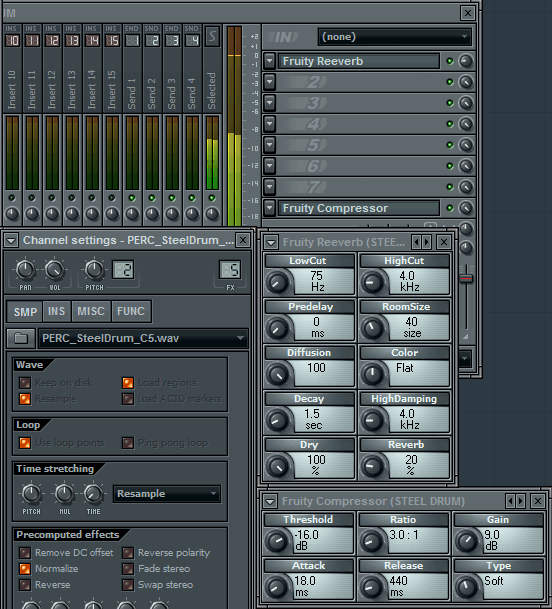
Note that I’ve lowered the volume of the reverb effect a bit. Now we’re sounding a little more like the commercial production. Let’s get the orchestral hit in there.
Step 4
The orchestral hit is the first sound we hear in the track, and it is used almost every first beat of every measure in the song. You can find it by browsing to Packs > HIT_2. While you’re there, take a listen to “HIT_3,” which was used by Neptunes producer Pharrell in the song “Moneymaker” by Ludacris.
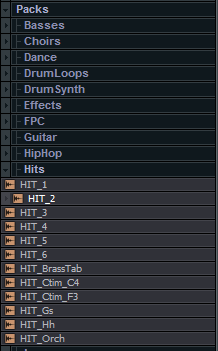
Again, right-click, load to a new channel, and turn the volume up to 100%. Add a note trigger to the first beat, and your step sequencer should now look like this:

Step 5
Almost spot on, but again, it will take a little work to make it sound like the real thing. And when I say little, I mean another reverb/compression FX chain! Assign HIT_2 to its own channel, and add a reverb and compressor.
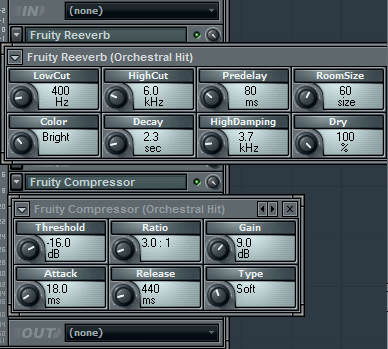
The result:
step_3.mp3
That’s it. We can now work on some of the beat’s elements.
Step 6
Southern Rap has gone through a phase where a lot of songs incorporate a fingersnap as opposed to a clap or snare, and ‘Crank That’ is no exception. The exact sound used in this song is called “HIP_Snaph.wav,” and can be found by navigating to “Packs > HipHop”
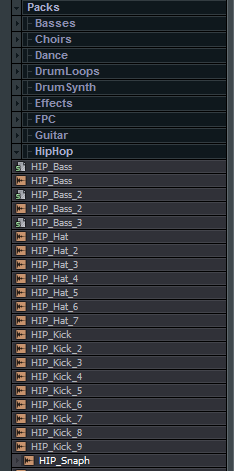
Load the sample, 100% volume, and assign to a new mixer channel. Put a trigger on every downbeat, and you’ve incorporated the Snap into your project. Your sequencer should look like this:

Step 7
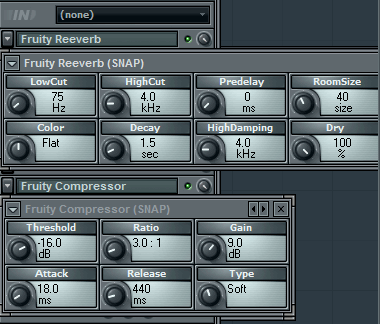
The snap in the song, along with a lot of other elements, is put through pretty heavy reverb and compression. Apply the following, which shares settings exactly like our HIT_2 chain:
Step 8
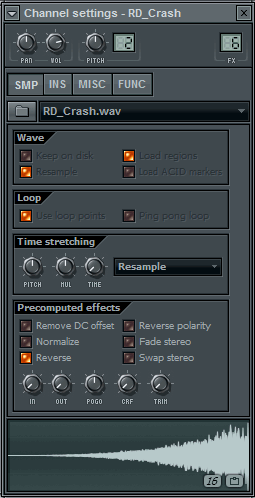
Now, I may not have the exact sample used for this effect, but it sounds pretty similar so we will use it for this tutorial. The crash used in “Crank That” is probably “RD_Crash.” Browse to it by selecting “Packs > Real Drum Kits”
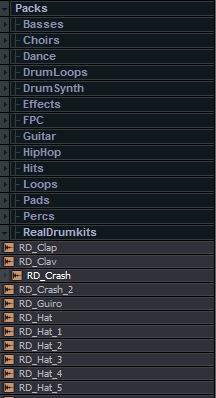
As you’ve done previously, load, adjust volume, and assign to its own mixer channel. Under the sample properties (this pane pops up when you select the sample name in the Step Sequencer), click on “Reverse” to quickly reverse the sample.
Step 9
We now need to specify when we want the crash to come in, so create a piano roll with this sample (as done previously with the steel drum) and draw the following:

The ghost notes are from our Steel Drum hits. Now all we need to do is apply (you guessed it)… more reverb and compression!
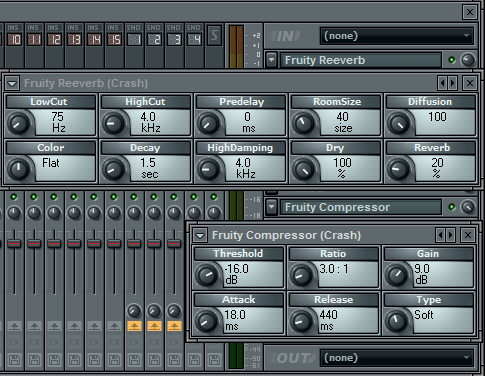
Note the adjustment to the reverb level. I won’t make you do that again–I promise!
snap_and_crash.mp3
Now with it all together, you have the first 16 bars from the original, exactly as they appear in the version that went 3x platinum. Here’s what it looks like in the Step Sequencer:

Simple? Absolutely! Done? Not yet!
Step 10
There is a lot of repetition with the beat and the samples contained in this song, so in the interest of time, we are going to add quite a few drum samples at once.

The samples prefixed with VT_ (BD_2, CL, CHiHat) can all be found in the “Vintage” subfolder in the “Packs” folder. Remember to add two “VT_BD_2″ channels. Samples prefixed with “HIP_” can be found in the “HipHop” subfolder in the “Packs” folder.
Both of the VT_BD_2’s, HIP_Kick_2, and HIP_Kick_6 can be added to the same mixer channel–I chose #1, and added a simple compressor with the “Vintage” preset.
VT_CL can be placed on the same mixer channel as your Orchestral hit (HIT_2).
VT_CHiHat can be placed on the same channel as the Steel Drum, “PERC_Steel_Drum_C5.”
Step 11
For what seems to be a relatively simple song, there quite a few variations in the beat. The song uses multiple kick samples, along with seemingly random Clave (VT_CL) use, and occasionally throwing in some hi-hats over the verse.
To capture the hi-hat rolls, I created a piano roll with the following score:

With 18 variations on the beat’s sequencing, explaining each one would take far too much time–reference this tut’s Play Pack for the completed FL Studio project with full sequencing.
Here’s what your final product will sound like:
soulja_boy_crank_that_fl_studio_recreation.mp3
Download the Play Pack for this tutorial (6.2MB)
Contents
- FL Studio Source File (Completed Track)
- Audio files
- Printable PDF tutorial

Comments :
Post a Comment