If you fancy having a go at composing music to film, one of the first obstacles you will encounter is how to synchronize the music to the action in the film. Whether you are using real or virtual instruments, you are going to have to make the music follow the picture, and if you are working to a brief they may specify exactly where they want sections of music to start and finish.
In this tutorial I’m going to look at how we can import such a film into Cubase 4 and compose some music for it. I’ve put together a short nature sequence with butterflies and a spider (this is not going to win any Oscars, but it will suffice to practice with!) and I’ve written an imaginary brief from a producer specifying what should happen at certain timecode points in the film.
By creating a marker track and putting markers at specified points, we will lock the markers to the timecode. We can then experiment with altering the tempo or length of the music, while ensuring that it will always start and finish at the timecode points we want it to.
The emphasis of this tutorial is in showing the technical process rather than writing an award winning score. I have written some light melodic music for the butterfly scenes and a simple dark string piece for the spider scene — you are free to download the timecoded original film and brief and have a go at scoring it youself!
The Brief
We have a short nature sequence which starts with butterflies on a tree. The film cuts away to a scene of a spider on a web, and then back to some more butterflies. I’m looking for light melodic music during the butterfly scenes, maybe using harps, flutes, strings or light synth sounds. The spider scene should be darker and ominous with strings or synthetic atmosphere sounds.
Cues
In timecode, the four sets of numbers indicate the position in the film in hours, minutes, seconds and frames. Our imaginary director has provided us with the following cuesheet:
00:00:00:00 – Start of sequence, something light and melodic and simple should start here.
00:00:18:03 – Start of zoom onto butterfly. The music can come up a step here as the camera zooms in.
00:00:00:28 – The butterfly music should be faded out by this point.
00:00:30:00 – Cut to spider on web, this should be marked by something simple, dark, and ominous.
00:00:58:00 – The spider music should be faded out by this point, or it can ring on until the start of the next cue.
00:01:00:00 – Cut back to butterflies, bring back something light and melodic, similar to opening music, maybe a variation.
00:01:12:21 – Music to finish by this point.
Step 1
Fire up Cubase 4 and start a new blank project. From the track column, add a video track.

Step 2
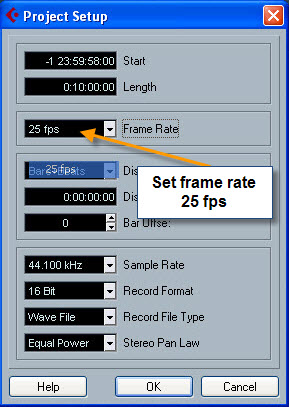
The film we are working with is in PAL format with a frame rate of 25 fps (25 frames per second). It is essential to go to Project Setup from the Project Menu and make sure that the video framerate is set to 25 fps, or your music will not be properly synchronized with the video.
Step 3
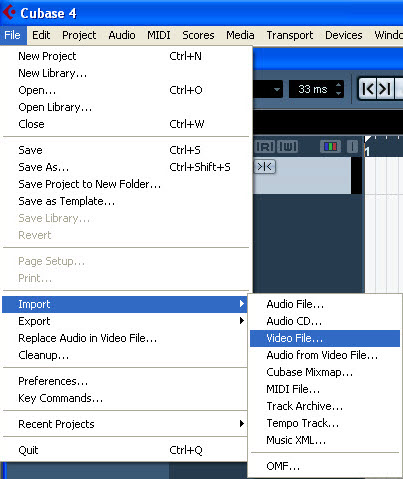
From the file menu, browse for the butterfly film and import the video.
Step 4
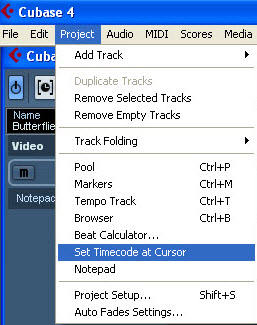
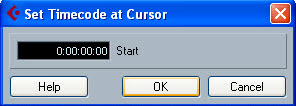
Drag the video part so that it starts at bar 2. It’s wise to do this so there’s some space before the video starts for count in and automated effects, but because we have moved the video the timecode in Cubase will not correspond to the timecode displayed on the video. What we need to do is alter the timecode of Cubase so that at bar 2 it reads 00:00:00:00, the same as the first frame of the video. Move the cursor so it is exactly over bar 2, then from the project menu select “Set Timecode at Cursor” and set it to 00:00:00:00.
Step 5
In the transport bar hover over the time display and right click to bring up the drop down menu, then select timecode instead of the default bars and beats.

Step 6
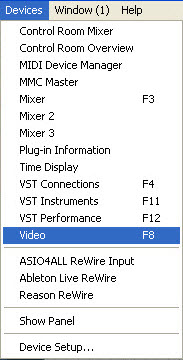
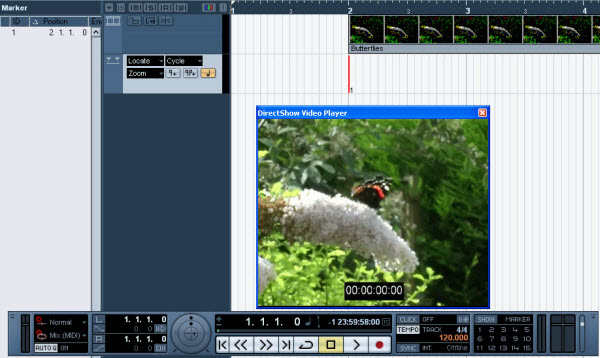
We can see a thumbnail display of the video in the video track, but we want to be able to see a proper preview of the video. From the devices menu select Video, which opens up the preview panel. You can see that there is a timecode display overlaid on the video. The cursor is at bar 2 and the timecode on both the video and the transport bar read 00:00:00:00, so we know that everything is lined up properly.
The preview panel is also useful because if you place the cursor over it and drag left or right, you’ll move backwards or forwards through the video. Similarly, dragging upwards or downwards on any of the numbers in the timecode display will move you back and forward through the film, which is particularly useful if you want to advance one frame at a time by hovering over the frame’s display (on the right of the four sets of numbers).

Step 7
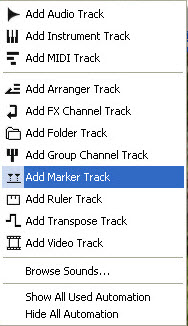
Next, from the track panel, right click and add a marker track.
Step 8
With the cursor exactly over bar 2 use the pencil tool to draw a marker in the marker track. So, the first marker is on bar 2 and at timecode 00:00:00:00.
Step 9
Continue adding markers to the marker track at the timecode points specified in the list of cues. You can use the pencil tool, or advance to the specified timecode and click a marker number (the list of numbers 1-15 on the right hand side of the transport panel) whilst holding down shift. This list of marker numbers in the transport panel also serves as a way of quickly navigating to a particular marker.


Step 10
The marker list on the left of the tracks panel shows the seven markers and their position in bars and beats.

Step 11
Return to the first marker, and click the warp tab on the toolbar at the top right. Notice that the blue area turns burgundy, indicating we are now in warp mode. By holding down shift and clicking with the cursor over the marker, the tempo will be locked at that point creating a new tempo event. In this case it has created a tempo of 120 BPM at that point.

Step 12
Take a look at marker two. We need to adjust the tempo so that marker two falls at the start of a bar/beat/quantize value, so we can sequence the music easily. In timewarp mode, drag a bar to a marker, dragging a point in bars and beats to a point in timecode where we want it to fall. This effectively alters the tempo between markers but means we can move a particular bar/beat/quantize value to fall exactly where we want it to. We can control how the tempo will be effected by dragging a bar or beat from the left or right.

Step 13
I don’t need much of a tempo change here, but just want to get marker two lined up so it falls on a beat or bar, so I just dragged the faint gray line which represents bar 11 to marker 2.

Step 14
After that, we shift click on marker 2 and create a new tempo event at that point of 119 bpm.

Step 15
Proceed with markers 3 and 4, just dragging the nearest bar or beat to the marker as we don’t need much of a tempo change. Shift click on the markers to create new tempo events and lock the positions.


Step 16
I want the section between markers 4 and 5 to be slower in tempo (for the spider music) and through experimentation I’ve found that dragging bar 29 all the way to marker five does a good job of this. Lock the tempo again.

Step 17
I’ve dragged bar 30 to marker 6. Lock the tempo again and create a new timecode event by shift clicking the marker. You can experiment with dragging bars from the left or right, and nearer or further to achieve required tempos.


Step 18
Finally, I dragged bar 36.3 to marker 7 and locked the tempo. Now I’m ready to create music that will be sequenced exactly in time with the events and timecodes specified.


Step 19
I found some patches that I liked from VST synths and composed the first part of the music to represent the opening butterfly scene. At marker 2 a further string sound comes in to mark the zoom on the butterfly as specified in the cue sheet. The music fades by marker 3 as specified.

Step 20
I used some some simple string sounds and a simple melody with a dark feel to represent the spider section. It fades out by marker 5.

Step 21
Finally I created a simple piece for the final butterfly section using the same patches and a similar melody and feel to the opening piece. It fades by marker 7.

Step 22
With the whole soundtrack finished and mixed, I exported the audio mixdown and imported the soundtrack into my video software to mix it into the film.

Step 23
Here is the finished product!
Finished Butterfly Film from AUDIOTUTS Video on Vimeo.
Conclusion
I hope you have found this tutorial useful as an introduction to using markers and timewarping to score music to picture. Feel free to use the included video and brief to have a go yourself. If you have your own piece of video, why not have a go at logging the significant timecodes to make a cue sheet and your own brief? This makes good practice, or you could have a go at re-scoring parts of well known films.

Comments :
Post a Comment